はじめに FutureVuls では、 vuls によるサーバスキャンや trivy によるコンテナイメージスキャンはもちろんのこと、Amazon Inspector( EC2 / ECR / Lambda )や SBOM の取り込みにも対応しています。より詳細な対応状況は、こちらの「スキャン方法の選択肢と特徴 と 対応環境 」をご確認ください!
特定のソフトウェアや、ネットワーク機器を含めたハードウェアの脆弱性を管理する手法としては、 CPE(Common Platform Enumeration) CPE スキャン
「CPE スキャン」の利用にあたり、登録したいソフトウェア・ハードウェアの「CPE 名」を特定する必要があります。Official Common Platform Enumeration (CPE) Dictionary 」で配信されています。同サイトの「Search Common Platform Enumerations (CPE) 」により Vendor や Product による検索も可能です。
FutureVuls には「CPE 検索 」という Vendor、Product から CPE 候補を検索する機能が備わっています。
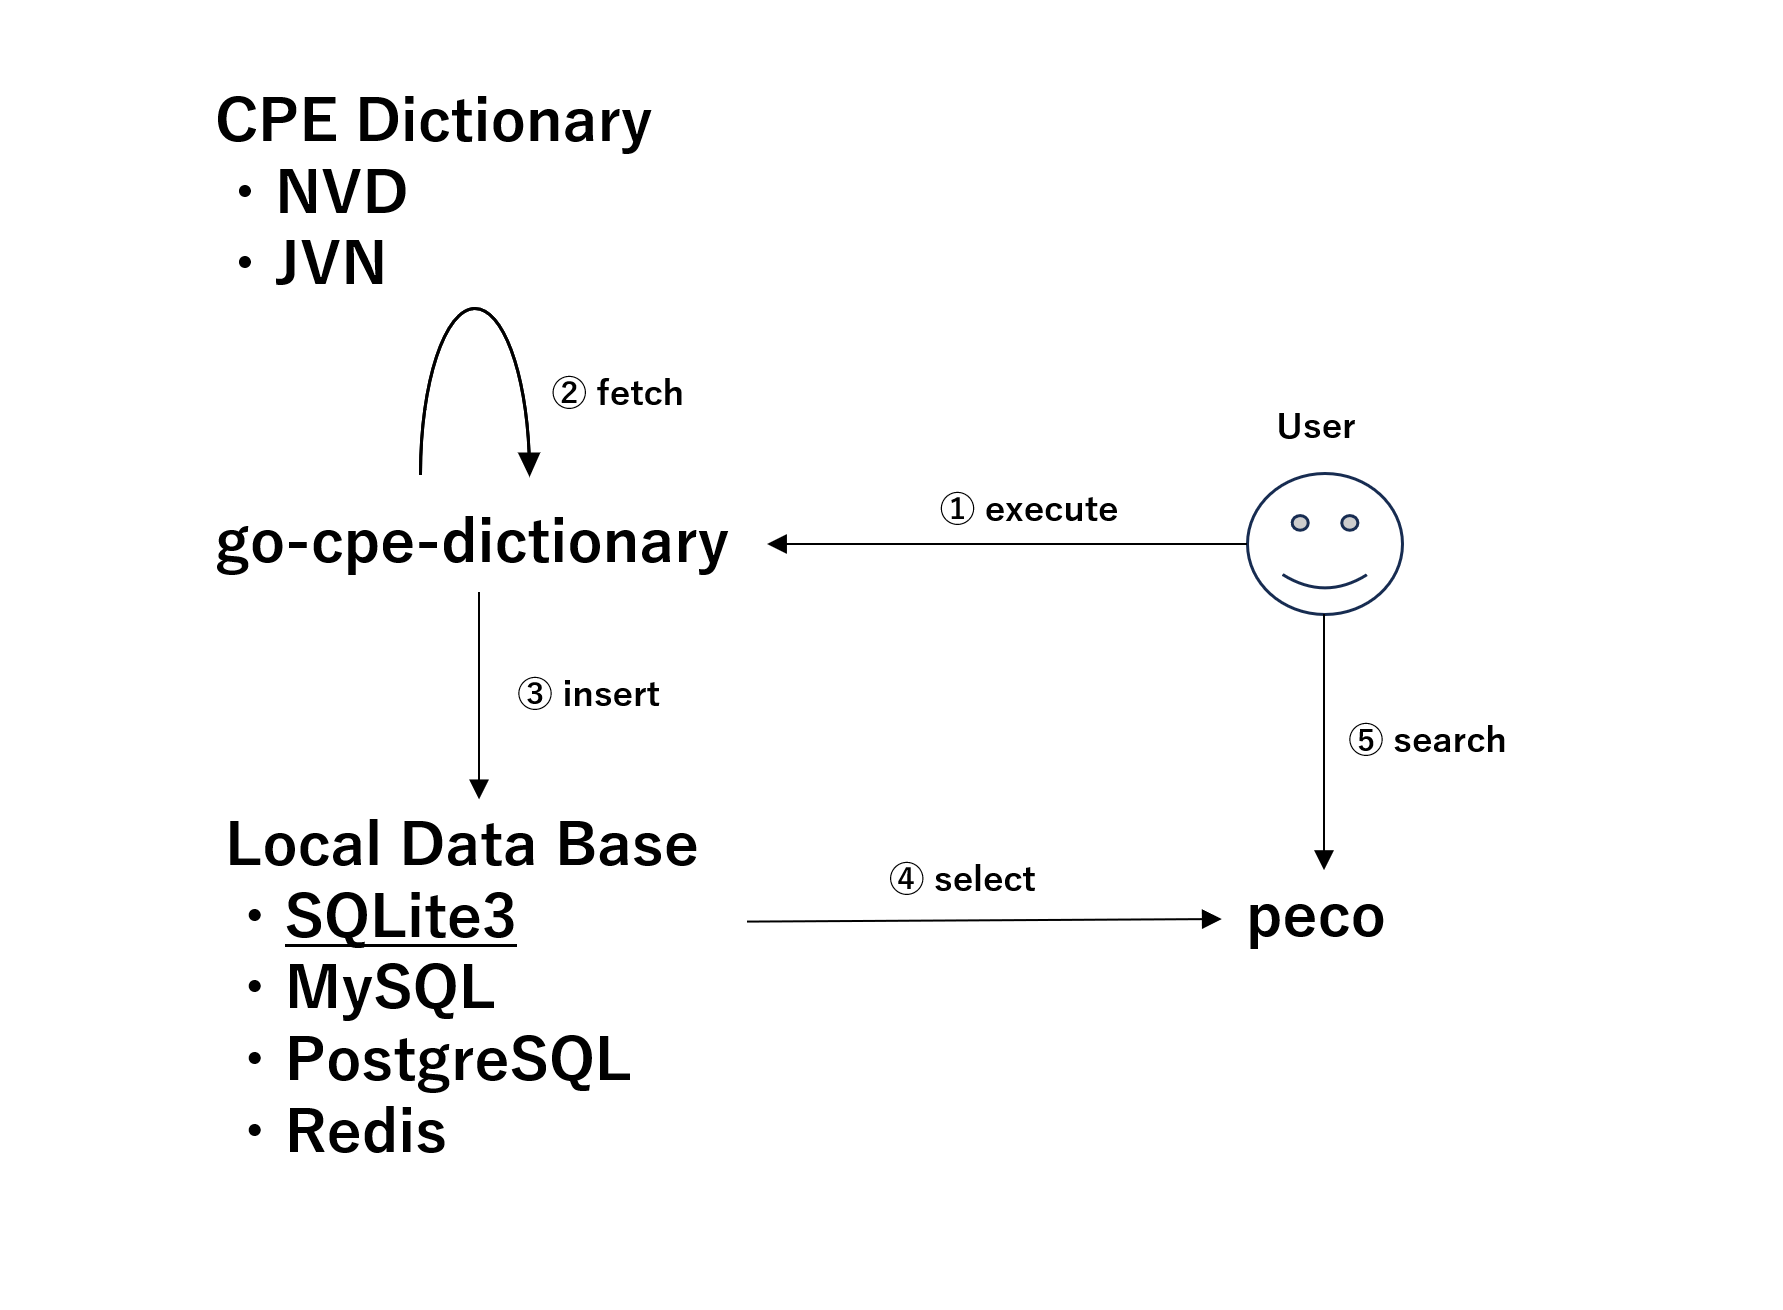
本ブログでは、CPE 名を CPE のフォーマットを活用して検索する 手法として、go-cpe-dictionary と peco と sqlite3 を組み合わせた方法を説明します。
動作環境 本ブログの内容は、Ubuntu 22.04 にて実施しました。
1
2
3
$ cat /etc/os-release PRETTY_NAME="Ubuntu 22.04.4 LTS" ...
CPE 辞書のダウンロードと検索には、以下のツールを利用します。
全体像
本ブログの大まかな流れを、以下の表に整理しました。
CPE 辞書の取得 CPE 検索のために、まずは NVD・JVN から CPE 辞書をダウンロードします。
CPE 辞書の保存先として、go-cpe-dictionary は以下の DB が利用可能です。
SQLite(デフォルト)
MySQL
PostgreSQL
Redis
本ブログでは、SQLite を用いて CPE 辞書を検索する方法を扱います。
go-cpe-dictionary のインストールまず、CPE 辞書の「ダウンロード」に利用する go-cpe-dictionary をインストールします。v0.6.0 」を対象としたインストールコマンドを記載します。
以下のコマンドにより go-cpe-dictionary をインストールします。
1 2 3 4 5 6 7 8 9 10 11 12 13 $ cd ~; mkdir cpe-search; cd cpe-search $ wget https://github.com/vulsio/go-cpe-dictionary/releases/download/v0.6.0/go-cpe-dictionary_0.6.0_linux_amd64.tar.gz ... $ tar -xzf go-cpe-dictionary_0.6.0_linux_amd64.tar.gz $ ./go-cpe-dictionary version go-cpe-dictionary 0.6.0 69719c59658e42958931441fa2c7db8325fd77dc
バージョンの確認コマンドが実行できれば、go-cpe-dictionary のインストールは完了です。$PATH 配下に配置する( mv または cp する)ことで、任意のディレクトリでコマンドを実行できるようになります。
1 2 3 $ echo $PATH | tr ":" "\n" ...
go-cpe-dictionary で実行可能なオプションは --help により確認できます。fetch を利用して、CPE 辞書を取得します。
1
2
3
4
5
6
7
8
9
10
11
12
13
14
15
16
17
18
19
20
21
22
23
24
25
26
$ go-cpe-dictionary --help GO CPE Dictionary Usage: go-cpe-dictionary [command ] Available Commands: completion Generate the autocompletion script for the specified shell fetch Fetch the data of CPE help Help about any command server Start CPE dictionary HTTP server version Show version Flags: --config string config file (default is $HOME /.go-cpe-dictionary.yaml) --dbpath string /path/to/sqlite3 or SQL connection string (default "/home/user/cpe-search/cpe.sqlite3" ) --dbtype string Database type to store data in (sqlite3, mysql, postgres or redis supported) (default "sqlite3" ) --debug debug mode (default: false ) --debug-sql SQL debug mode -h, --help help for go-cpe-dictionary --http-proxy string http://proxy-url:port (default: empty) --log-dir string /path/to/log (default "/var/log/go-cpe-dictionary" ) --log-json output log as JSON --log-to-file output log to file Use "go-cpe-dictionary [command] --help" for more information about a command .
go-cpe-dictionary fetch --help
1
2
3
4
5
6
7
8
9
10
11
12
13
14
15
16
17
18
19
20
21
22
23
24
25
26
27
28
$ go-cpe-dictionary fetch --help Fetch the data of CPE Usage: go-cpe-dictionary fetch [command ] Available Commands: jvn Fetch CPE from JVN nvd Fetch CPE from NVD vuls Fetch CPE from Vuls Flags: --batch-size int The number of batch size to insert. (default 100) -h, --help help for fetch --threads int The number of threads to be used (default 12) Global Flags: --config string config file (default is $HOME /.go-cpe-dictionary.yaml) --dbpath string /path/to/sqlite3 or SQL connection string (default "/home/user/cpe-search/cpe.sqlite3" ) --dbtype string Database type to store data in (sqlite3, mysql, postgres or redis supported) (default "sqlite3" ) --debug debug mode (default: false ) --debug-sql SQL debug mode --http-proxy string http://proxy-url:port (default: empty) --log-dir string /path/to/log (default "/var/log/go-cpe-dictionary" ) --log-json output log as JSON --log-to-file output log to file Use "go-cpe-dictionary fetch [command] --help" for more information about a command .
CPE 辞書をダウンロードする go-cpe-dictionary を用いて、CPE 辞書をダウンロードする方法を説明します。
SQLite のフォーマットで出力する go-cpe-dictionary はダウンロードした CPE 辞書を SQLite のフォーマットで出力します。--dbpath、--dbtype を指定すれば、PostgreSQL や Redis への格納も可能です。
まず、以下コマンドを実行して、NVD・JVN が配信する CPE 辞書をダウンロードします。
go-cpe-dictionary fetch nvd
1 2 3 4 5 6 7 8 9 10 11 12 $ cd ~ $ mkdir cpe-search $ cd ~/cpe-search/ $ go-cpe-dictionary fetch nvd INFO[06-03|00:32:55] Fetching... URL=https://github.com/vulsio/vuls-data-raw-nvd-api-cpe/archive/refs/heads/main.tar.gz INFO[06-03|00:34:01] Fetching... URL=https://github.com/vulsio/vuls-data-raw-nvd-api-cpematch/archive/refs/heads/main.tar.gz INFO[06-03|00:37:22] Inserting new CPEs 1454401 / 1454401 [-------------------------------------------------------------------------------] 100.00% 11923 p/s
go-cpe-dictionary fetch jvn
1 2 3 4 5 6 7 8 9 10 11 12 13 14 15 16 17 18 19 20 21 22 23 24 25 26 27 28 $ go-cpe-dictionary fetch jvn INFO[06-03|00:45:43] Fetching... URL=https://jvndb.jvn.jp/ja/rss/years/jvndb_2002.rdf INFO[06-03|00:45:43] Fetching... URL=https://jvndb.jvn.jp/ja/rss/years/jvndb_2003.rdf INFO[06-03|00:45:43] Fetching... URL=https://jvndb.jvn.jp/ja/rss/years/jvndb_2005.rdf INFO[06-03|00:45:43] Fetching... URL=https://jvndb.jvn.jp/ja/rss/years/jvndb_2004.rdf INFO[06-03|00:45:43] Fetching... URL=https://jvndb.jvn.jp/ja/rss/years/jvndb_2007.rdf INFO[06-03|00:45:43] Fetching... URL=https://jvndb.jvn.jp/ja/rss/years/jvndb_2008.rdf INFO[06-03|00:45:43] Fetching... URL=https://jvndb.jvn.jp/ja/rss/years/jvndb_2006.rdf INFO[06-03|00:45:43] Fetching... URL=https://jvndb.jvn.jp/ja/rss/years/jvndb_2009.rdf INFO[06-03|00:45:43] Fetching... URL=https://jvndb.jvn.jp/ja/rss/years/jvndb_2010.rdf INFO[06-03|00:45:43] Fetching... URL=https://jvndb.jvn.jp/ja/rss/years/jvndb_2011.rdf INFO[06-03|00:45:43] Fetching... URL=https://jvndb.jvn.jp/ja/rss/years/jvndb_2012.rdf INFO[06-03|00:45:43] Fetching... URL=https://jvndb.jvn.jp/ja/rss/years/jvndb_2013.rdf INFO[06-03|00:45:44] Fetching... URL=https://jvndb.jvn.jp/ja/rss/years/jvndb_2014.rdf INFO[06-03|00:45:44] Fetching... URL=https://jvndb.jvn.jp/ja/rss/years/jvndb_2015.rdf INFO[06-03|00:45:45] Fetching... URL=https://jvndb.jvn.jp/ja/rss/years/jvndb_2016.rdf INFO[06-03|00:45:48] Fetching... URL=https://jvndb.jvn.jp/ja/rss/years/jvndb_2017.rdf INFO[06-03|00:45:52] Fetching... URL=https://jvndb.jvn.jp/ja/rss/years/jvndb_2018.rdf INFO[06-03|00:45:52] Fetching... URL=https://jvndb.jvn.jp/ja/rss/years/jvndb_2019.rdf INFO[06-03|00:45:54] Fetching... URL=https://jvndb.jvn.jp/ja/rss/years/jvndb_2020.rdf INFO[06-03|00:45:55] Fetching... URL=https://jvndb.jvn.jp/ja/rss/years/jvndb_2021.rdf INFO[06-03|00:45:56] Fetching... URL=https://jvndb.jvn.jp/ja/rss/years/jvndb_2022.rdf INFO[06-03|00:45:56] Fetching... URL=https://jvndb.jvn.jp/ja/rss/years/jvndb_2023.rdf INFO[06-03|00:45:57] Fetching... URL=https://jvndb.jvn.jp/ja/rss/years/jvndb_2024.rdf INFO[06-03|00:45:58] Fetching... URL=https://jvndb.jvn.jp/ja/rss/jvndb_new.rdf INFO[06-03|00:45:59] Fetching... URL=https://jvndb.jvn.jp/ja/rss/jvndb.rdf INFO[06-03|00:46:27] Inserting new CPEs
本ブログ執筆時点では、NVD と JVN の CPE 辞書を合算すると、データサイズは 540MB となりました。
1 2 3 $ du -h cpe.sqlite3 540M cpe.sqlite3
CPE 辞書のデータは、以下のテーブル定義で格納されています。
sqlite3 コマンドを使うことで、Query による検索が可能です。
Linux環境であれば、以下コマンドにより sqlite3 をインストールします。
1 2 3 4 5 6 7 8 $ sudo yum install sqlite3 -y $ sudo apt install sqlite3 -y $ which sqlite3 /usr/bin/sqlite3
sqlite3 により、go-cpe-dictionary が出力した cpe.sqlite3 への SQL 実行が可能です。
1 2 3 4 5 6 7 8 9 10 11 $ sqlite3 ./cpe.sqlite3 'select count(1) from categorized_cpes' 1525650 $ sqlite3 ./cpe.sqlite3 'select id, fetch_type, title, cpe_uri from categorized_cpes limit 5' 1|nvd|Mods for HESK 2.6.1|cpe:/a:mods-for-hesk:mods_for_hesk:2.6.1 2|nvd|Debian Advanced Package Tool (APT) 2.0.6|cpe:/a:debian:advanced_package_tool:2.0.6 3|nvd|Vercel Next.js 12.3.2 Canary8 for Node.js|cpe:/a:vercel:next.js:12.3.2:canary8:~~~node.js~~ 4|nvd|adrotateplugin adrotate 3\.6\.4|cpe:/a:adrotateplugin:adrotate:3.6.4 5|nvd|libextractor libextractor 0\.3\.8|cpe:/a:libextractor:libextractor:0.3.8
以上で、CPE 辞書のダウンロードと検索環境の構築は完了です。sqlite3 コマンド経由で任意の Query を実施できるようになりました。
CPE 辞書をインタラクティブに検索する ここまでの環境構築により、NVD とJVN からCPE 辞書を取得する作業は完了しています。
CPE 名に目途がついている場合には、Query 検索時の Where 句で vender や product の指定による絞り込みが可能です。
1 2 3 4 5 6 7 8 9 10 11 12 $ sqlite3 ./cpe.sqlite3 'select id, fetch_type, title, cpe_uri from categorized_cpes where vendor = "amazon" limit 10' 42|nvd|Amazon Sockeye 2.2.0 for Python|cpe:/a:amazon:sockeye:2.2.0::~~~python~~ 246|nvd|Amazon AWS Software Development Kit (SDK) 2.3.9 for Android|cpe:/a:amazon:aws_software_development_kit:2.3.9::~~~android~~ 317|nvd|Amazon AWS SDK for JavaScript 2.117.0 for Node.js|cpe:/a:amazon:aws_sdk_for_javascipt:2.117.0::~~~node.js~~ 338|nvd|Amazon AWS Software Development Kit (AWS SDK for PHP) 3.64.12 for PHP|cpe:/a:amazon:aws_software_development_kit:3.64.12:-:~~~php~~ 390|nvd|Amazon aws-sdk-java (AWS SDK for Java) 1.11.209|cpe:/a:amazon:aws-sdk-java:1.11.209 693|nvd|Amazon AWS SDK for JavaScript 2.89.0 for Node.js|cpe:/a:amazon:aws_sdk_for_javascipt:2.89.0::~~~node.js~~ 707|nvd|Amazon AWS Software Development Kit (aws-sdk-go) 1.42.27 for Go|cpe:/a:amazon:aws_software_development_kit:1.42.27::~~~go~~ 716|nvd|Amazon AWS Software Development Kit (AWS SDK for PHP) 3.19.13 for PHP|cpe:/a:amazon:aws_software_development_kit:3.19.13:-:~~~php~~ 1138|nvd|Amazon AWS Cloud Development Kit (AWS CDK) 2.42.0|cpe:/a:amazon:aws_cloud_development_kit:2.42.0 1208|nvd|Amazon aws-sdk-java (AWS SDK for Java) 1.11.219|cpe:/a:amazon:aws-sdk-java:1.11.219
ここでは、CPE をインタラクティブに探す方法として「peco 」を用いた手法を紹介します。
peco のインストールLinux 環境の場合は、以下のコマンドにより peco をインストールします。
1 2 3 4 5 6 7 8 $ sudo yum install peco -y $ sudo apt install peco -y $ which peco /usr/bin/peco
peco は標準入力でリストを受け取ります。peco の動きを確認してください。
1 2 3 4 5 6 $ history | peco QUERY> ...
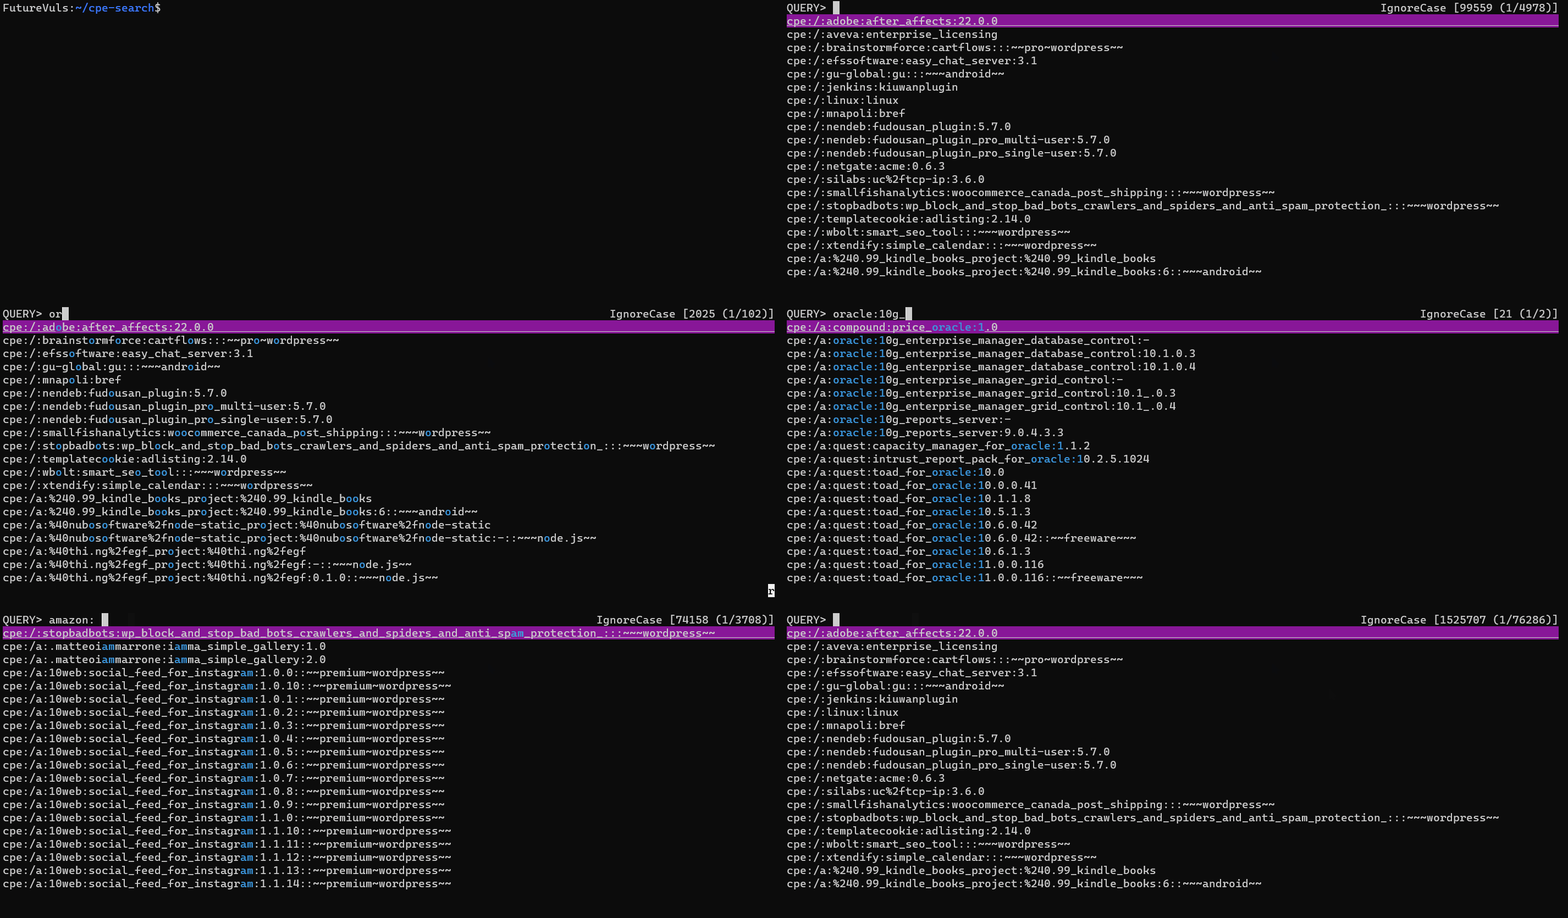
peco による検索sqlite3 で CPE 名を取得し、パイプラインで peco に渡すことで、CPE 名のインタラクティブな検索ができます。
1
2
3
4
5
6
7
8
9
10
11
12
13
14
$ sqlite3 ./cpe.sqlite3 'select cpe_uri from categorized_cpes' | peco QUERY> IgnoreCase [1525650 (1/56506)] cpe:/:adobe:after_affects:22.0.0 cpe:/:aveva:enterprise_licensing cpe:/:brainstormforce:cartflows:::~~pro~wordpress~~ cpe:/:efssoftware:easy_chat_server:3.1 cpe:/:gu-global:gu:::~~~android~~ cpe:/:jenkins:kiuwanplugin cpe:/:linux:linux cpe:/:mnapoli:bref ...
検索したい文字列を >QUERY に入力すると、その文字列によりフィルタされたリストが表示されます。amazon で検索した場合には、以下のリストが表示されます。
1
2
3
4
5
6
7
8
9
QUERY> amazon IgnoreCase [8864 (1/329)] cpe:/a:2kblater:2kb_amazon_affiliates_store cpe:/a:2kblater:2kb_amazon_affiliates_store:1.0.0::~~~wordpress~~ cpe:/a:2kblater:2kb_amazon_affiliates_store:1.0.1::~~~wordpress~~ cpe:/a:2kblater:2kb_amazon_affiliates_store:1.0.2::~~~wordpress~~ cpe:/a:2kblater:2kb_amazon_affiliates_store:1.0.3::~~~wordpress~~ cpe:/a:2kblater:2kb_amazon_affiliates_store:1.0.4::~~~wordpress~~ cpe:/a:2kblater:2kb_amazon_affiliates_store:1.0.5::~~~wordpress~~ ...
peco の出力内容を確認しながら「検索文字」を変えることにより、文字列のフィルタが自動更新されて、CPE 名のインタラクティブな探索が可能となります。
おわりに 本ブログでは、以下の手法による「インタラクティブな CPE 名の検索方法」を紹介しました。
go-cpe-dictionary により、CPE 辞書をローカルにダウンロードする方法peco + sqlite3 により、CPE 辞書をインタラクティブに検索する方法
参考、参照


